Java并发保重线程同步器原理剖析
CountDownLatch 原理剖析
CountDownLatch 介绍
日常开发中可能我们可能遇到需要开启多个子线程去并行执行任务,并且 主线程需要等待所有子线程执行完毕后再进行汇总 的场景。我们可以使用 join() 方法(等待该子线程线程执行完毕),但是join()不灵活而且很多场景可能使用不了,所以JDK中提供了 CountDownLatch 这个类。我们来看一下 CountDownLatch 的使用案例。
1 | public class JoinCountDownLatch { |
运行结果:
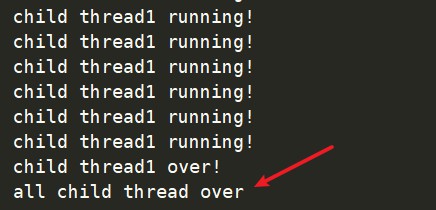
我们可以看到 main 函数最后一条语句总是等待两个子线程运行结束才会运行。
当然我们还可以使用线程池的方式创建,以避免直接操作Thread。而且使用线程池来管理线程一般直接添加 Runnable 到线程池,这个时候我们就没有办法调用 join 方法了,所以说 CountDownLatch 比 join 更具有灵活性。
1 | public class JoinCountDownLatch { |
CountDownLatch 实现原理探究
在学习 AQS 的时候提到过, AQS 是同步器的基本组成部分,而且其中 AQS 的 state 是用来表示 CountDownLatch 的计数器的。我们可以查看 CountDownLatch 的类图结构。
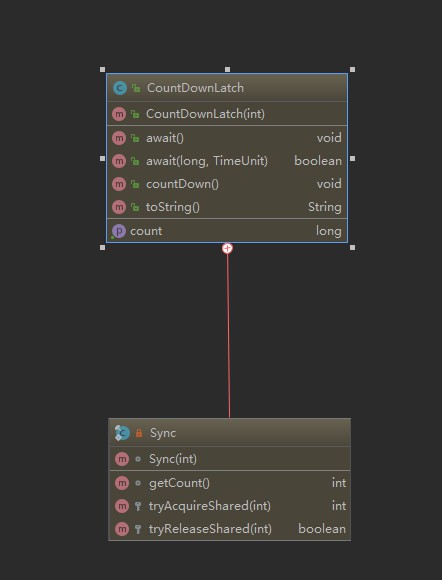
因为 Sync 是继承了 AQS 的,他实现了一些 AQS 的方法,所以可以说 CountDownLatch 是基于 AQS 实现的。
1 | public CountDownLatch(int count) { |
void await()
当线程调用 CountDownLatch 对象的 await() 方法后,当前线程会被阻塞(上面案例是主线程调用的await 所以主线程会被阻塞),当所有线程调用了 CountDownLatch 的 countDown 方法后,即计数器的值为0的时候,调用 await 方法的线程会返回,或者当其他线程调用了当前被阻塞线程的 interrupt() 方法中断了饿当前线程,当前线程就会抛出 InterruptedException 异常返回。
1 | public void await() throws InterruptedException { |
void countDown() 方法
线程调用该方法后 计数器的值递减,如果递减后计数器为0则唤醒因为调用 await 方法而被阻塞的线程,否则什么都不做。
1 | public void countDown() { |
CountDownLatch 小结
CountDownLatch 通过使用 AQS 实现,其中使用 AQS 的状态变量来存放计数器的值,当调用countDown方法的时候使state递减,调用await未得到满足的时候会 调用线程会被放入 AQS 阻塞队列中等待。 当其他线程调用 countDown方法并得到递减后的state为0的时候会调用 AQS 的 doReleaseShared 方法来激活由于调用 await() 方法而被阻塞的线程。
回环屏障 CyclicBarrier
对于 CountDownLatch 来说,线程同步后,等到计数器为0之后在调用 await 和 countDown 方法都会立即返回,也就是说 CountDownLatch 是一次性的。而 CyclicBarrier 会在所有子线程执行完毕后 重置 CyclicBarrier 的状态 。
CyclicBarrier 使用案例介绍
1 | public class CyclicBarrierTest1 { |
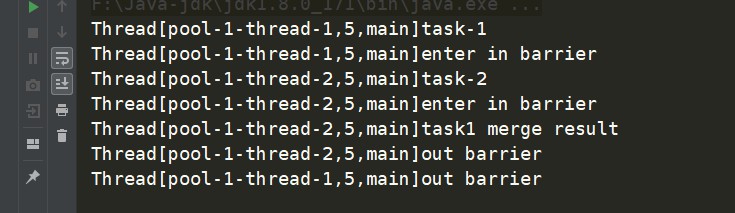
运行结果:
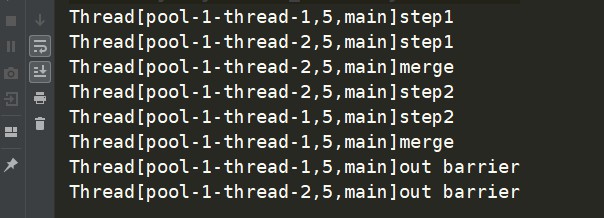
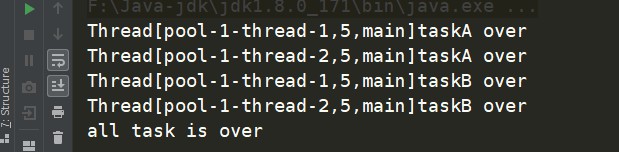
我们再来看一个 重复使用 的例子。这里我们没执行完一个步骤就汇总一次
1 | public class CyclicBarrierTest2 { |
运行结果:
CyclicBarrier 实现原理探究
我们首先看一下 CyclicBarrier 的类图。
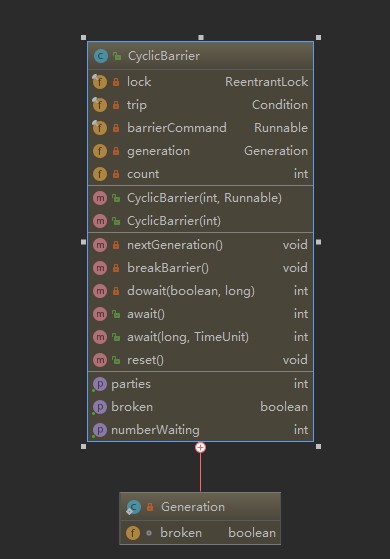
由此我们可以知道 CyclicBarrier 是通过 独占锁 来实现的。parties用来记录线程个数,这里表示多少个线程调用await方法后 所有线程才会冲破屏障。count 一开始等于 parties,count计数器变为0之后会将parties的值重新赋值给count,以达到重复利用的功能。
1 | public CyclicBarrier(int parties, Runnable barrierAction) { |
int await() 方法
当前线程调用该方法会被阻塞,知道满足下面条件之一才会返回:
- parties个线程调用了该方法,即到达屏障点
- 其他线程调用了当前线程的interrupt() 方法
- 与当前屏障点关联的 broken 标志被设置为 true 会抛出 BrokenbarrierException 然后返回。
1 | public int await() throws InterruptedException, BrokenBarrierException { |
- int dowait() 方法
1 | private int dowait(boolean timed, long nanos) |
CyclicBarrier 小结
与 CountDownLatch 不同的是 CyclicBarrier 可以实现复用,并且特别适用分段任务有序执行的场景。CyclicBarrier适用独占锁来保证计数器的原子性更新,并使用条件队列来实现线程同步。
信号量 Semaphore 原理探究
Semaphore 也是 Java 中的一个同步器,和前面的 CountDownLatch 和 CyclicBarrier 不同的是 Semaphore内部的计数器是递增的,并且在初始化的时候可以指定一个初始值,但是 并不需要知道需要同步的线程个数, 而是在需要同步的地方调用 acquire 方法时指定需要同步的线程个数 。
Semaphore 案例介绍
1 | public class SemaphoreTest { |
运行结果:

我们再来看一下 使用 Semaphore 实现复用。
1 | public class SemaphoreTest2 { |
怎么能够复用呢? 其实是因为主线程调用 acquire 方法返回后 信号量会重新变成0。
Semaphore 实现原理探究
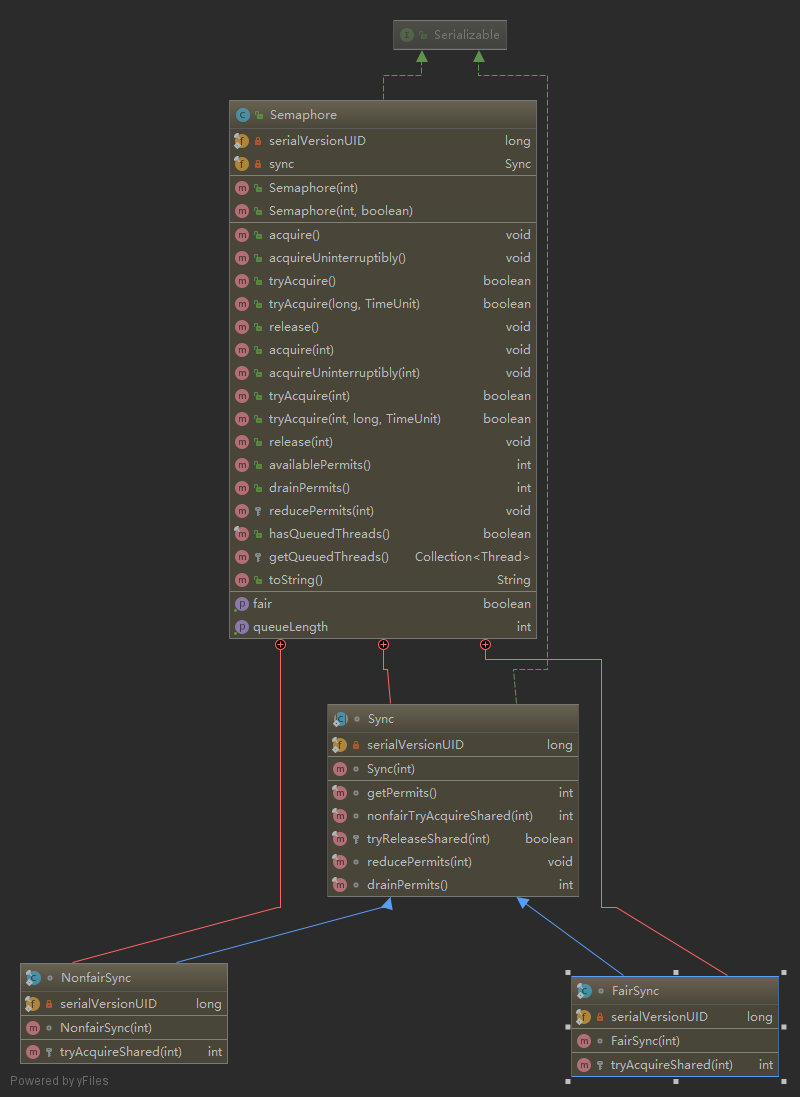
由类图可知,我们还是使用 AQS 实现的,并且还实现了获取信号量时是采用 公平策略 还是 非公平策略。
1 | // permits是初始化的计数器值 |
void acquire() 方法
当前线程调用该方法是 希望获取一个信号量资源。如果信号量个数大于0则当前信号量的计数会减一,然后该方法直接返回。否则如果当前信号量个数等于0,则当前线程会被放入 AQS 的阻塞队列。 当其他线程调用该线程的 interrupt() 方法中断了当前线程,当前线程会抛出 InterruptedException 然后返回。
1 | public void acquire() throws InterruptedException { |
- void acquire(int permits)
1 | public void acquire(int permits) throws InterruptedException { |
void release()
该方法是把当前的 Semaphore 对象的信号量值增加1,如果当前线程又因为调用 acquire 方法被阻塞放入 AQS 阻塞队列中,则会 根据公平策略选择一个信号量个数能被满足的线程进行激活, 激活的线程会尝试获取刚增加的信号量。
1 | public void release() { |
Semaphore 小结
Semaphore 内部使用了一个递增的计数器,这样就可以不在初始化的时候指定需要同步的线程个数了。它通过 AQS 实现,并且在获取信号量时有公平和非公平策略选择。