Java并发编程学习——Java并发编程之美学习笔记九

Java并发包中 ScheduledThreadPoolExecutor 原理探究

介绍

上篇文章中有提到过 Executors ,这是一个工具类,他提供了很多静态方法返回不同的线程池实例。 而其中的 newScheduledThreadPool 方法就提供了成成延迟线程池的实例。其中线程池队列是DelayWorkQueue 其和 DelayQueue 一样是一个延迟队列。

类图结构

ScheduledThreadPoolExecutor

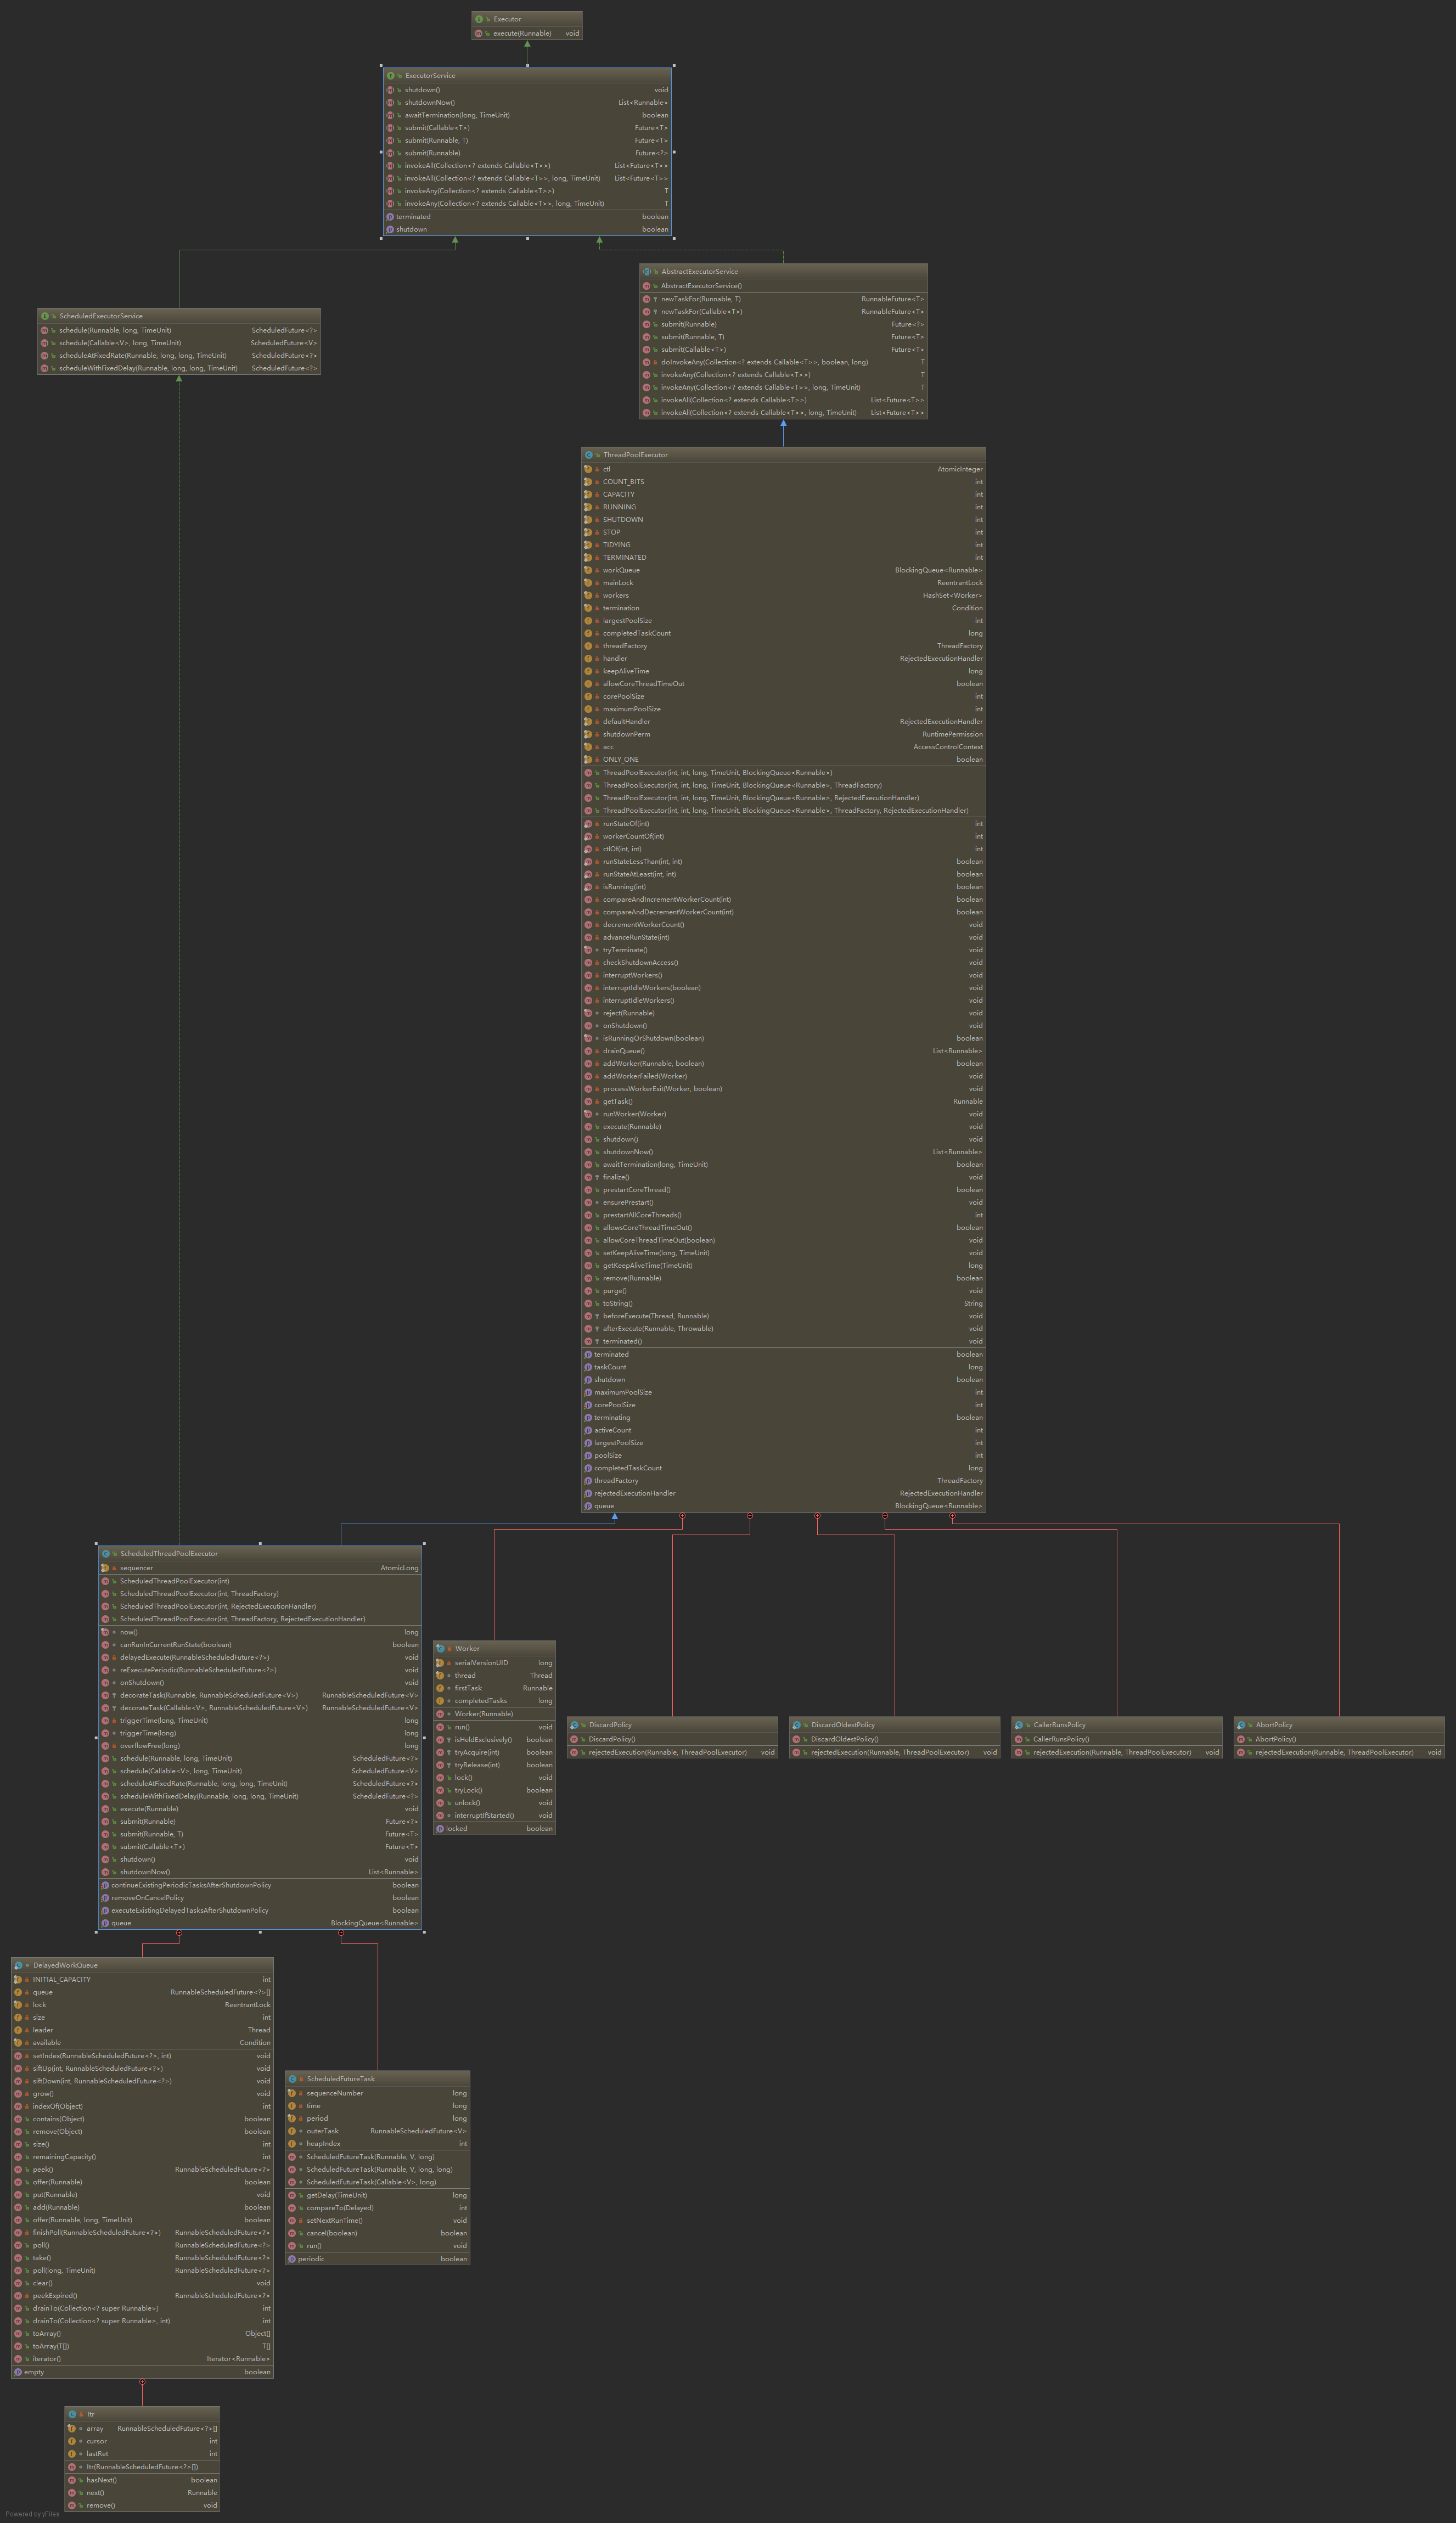
ScheduledFutureTask 是具有返回值的任务,继承自FutureTask。FutureTask 的内部有一个变量 state 用来表示任务的状态。

1
2
3
4
5
6
7
8
9
10
11
12
13
14
15
private volatile int state;
// 初始
private static final int NEW = 0;
// 执行中
private static final int COMPLETING = 1;
// 正常运行结束
private static final int NORMAL = 2;
// 运行中异常
private static final int EXCEPTIONAL = 3;
// 任务被取消
private static final int CANCELLED = 4;
// 任务正在被中断
private static final int INTERRUPTING = 5;
// 任务已经被中断
private static final int INTERRUPTED = 6;

有可能的任务状态转换途径为:

NEW -> COMPLETING -> NORMAL

NEW -> COMPLETING -> EXCEPTIONAL

NEW -> CANCLLED

NEW -> INTERRUPTING -> INTERRUPTED

ScheduledFutureTask 内部还有一个变量 period 用来表示任务的类型。当 period 为0的时候说明当前任务是一次性的,period为负数的时候说明当前任务为 fixed-delay 固定延迟的定时可重复执行任务,period为整数说明当前任务为 fixed-rate 任务,是固定频率的定时可重复执行任务。

1
2
3
4
5
6
7
8
9
10
11
12
public static ScheduledExecutorService newScheduledThreadPool(intcorePoolSize) {
return new ScheduledThreadPoolExecutor(corePoolSize);
}
public static ScheduledExecutorService newScheduledThreadPool(
int corePoolSize, ThreadFactory threadFactory) {
return new ScheduledThreadPoolExecutor(corePoolSize, threadFactory);
}
// 只有核心线程数目的构造函数 阻塞队列使用的是 DelayWorkQueue
public ScheduledThreadPoolExecutor(int corePoolSize) {
super(corePoolSize, Integer.MAX_VALUE, 0, NANOSECONDS,
new DelayedWorkQueue());
}

原理剖析

主要讲解三个重要函数

  • schedule(Callable< V > callable, long delay, TimeUnit unit)
  • scheduleWithFixedDelay(Runnable command, long initialDelay, long delay, TimeUnit unit)
  • scheduleAtFixedRate(Callable< V > callable, long delay, TimeUnit unit)

schedule(Callable< V > callable, long delay, TimeUnit unit)

该方法的作用是 提交一个延迟执行的任务 ,任务从提交时间算起延迟单位为 unit 的delay 时间后开始执行。 提交的任务不是周期性任务, 任务只会执行一次。

1
2
3
4
5
6
7
8
9
10
11
12
13
14
15
16
17
18
19
20
21
22
23
24
25
26
27
28
29
30
31
32
33
34
35
36
37
38
39
40
41
42
43
44
45
46
47
48
49
50
51
52
53
54
55
56
57
58
59
60
61
62
63
64
65
66
67
68
69
70
public ScheduledFuture<?> schedule(Runnable command,
long delay,
TimeUnit unit) {
// 判空
if (command == null || unit == null)
throw new NullPointerException();
// 将任务转换为 RunnableScheduledFuture 类型
RunnableScheduledFuture<?> t = decorateTask(command,
new ScheduledFutureTask<Void>(command, null,
triggerTime(delay, unit)));
// 添加任务到延迟队列
// 因为延迟队列中的元素需要实现 元素实现是可比较的和继承Delayed并且拥有getDelay()方法
// 而上面的 ScheduledFutureTask就实现了getDelay和compareTo方法
// 其实最终这个t是ScheduledFutureTask类型的
delayedExecute(t);
return t;
}
// 我们来具体看一下 ScheduledFutureTask 相应的构造函数
ScheduledFutureTask(Runnable r, V result, long ns) {
// 调用了父类的构造函数 父类是FutureTask
super(r, result);
this.time = ns;
this.period = 0;
this.sequenceNumber = sequencer.getAndIncrement();
}
// 这里可以想到Thread的一种创建方式
public FutureTask(Runnable runnable, V result) {
// 将runnable转换为 callable
this.callable = Executors.callable(runnable, result);
// 设置当前任务状态为NEW
this.state = NEW; // ensure visibility of callable
}
// wtf??
// 貌似什么都没做 返回一个 RunnableScheduledFuture 类型的task
// 注意我们前面调用的时候传入的是 ScheduledFutureTask 而 ScheduledFutureTask
// 其实是实现了 RunnableScheduledFuture 的
protected <V> RunnableScheduledFuture<V> decorateTask(
Runnable runnable, RunnableScheduledFuture<V> task) {
return task;
}
private void delayedExecute(RunnableScheduledFuture<?> task) {
// 判断线程池是否是 SHUTDOWN 如果是则执行拒绝策略
if (isShutdown())
reject(task);
else {
// 获取BlockingQueue 然后添加任务到里面
// DelayQueue就是实现了 BlockingQueue
super.getQueue().add(task);
// 再次获取状态
// 如果是SHUTDOWN 且该任务可以运行给定当前运行状态和运行后关闭参数 那么移除task 然后取消任务
if (isShutdown() &&
!canRunInCurrentRunState(task.isPeriodic()) &&
remove(task))
task.cancel(false);
// 不然保证至少有一个线程在处理任务
else
ensurePrestart();
}
}
// 注意这里是执行任务了 就如上篇文章说到的 addWorker里面会执行任务
void ensurePrestart() {
// 获取worker数量
int wc = workerCountOf(ctl.get());
// 如果小于核心 那么添加线程
if (wc < corePoolSize)
addWorker(null, true);
// 小于0也添加线程
else if (wc == 0)
addWorker(null, false);
}

我们来看一下 ScheduledFutureTask 是如何执行任务的

1
2
3
4
5
6
7
8
9
10
11
12
13
14
15
16
17
18
19
20
21
22
23
24
25
26
27
28
29
30
31
32
33
34
35
36
37
38
39
40
41
42
43
44
45
46
47
48
49
50
51
52
53
54
55
public void run() {
// 是否执行一次
boolean periodic = isPeriodic();
// 任务不可以运行给定当前运行状态和运行后关闭参数
// 取消任务
if (!canRunInCurrentRunState(periodic))
cancel(false);
// 只执行一次
else if (!periodic)
ScheduledFutureTask.super.run();
// 定时执行
else if (ScheduledFutureTask.super.runAndReset()) {
// 设置time = time + period
setNextRunTime();
// 重新加入该任务到delay队列
reExecutePeriodic(outerTask);
}
}
// 父类的run FutureTask
public void run() {
// 判断任务状态
if (state != NEW ||
!UNSAFE.compareAndSwapObject(this, runnerOffset,
null, Thread.currentThread()))
return;
try {
Callable<V> c = callable;
if (c != null && state == NEW) {
V result;
boolean ran;
try {
// 调用call方法并返回值
result = c.call();
ran = true;
} catch (Throwable ex) {
result = null;
ran = false;
// 如果任务失败 设置当前任务状态为 EXCEPTION
setException(ex);
}
if (ran)
// 最后设置任务状态为NORMAL
// 所以这里只会执行一次 控制了任务状态
set(result);
}
} finally {
// 后续处理
runner = null;
// state must be re-read after nulling runner to prevent
// leaked interrupts
int s = state;
if (s >= INTERRUPTING)
handlePossibleCancellationInterrupt(s);
}
}

总结

ScheduledThreadPoolExecutor 的实现原理是通过内部使用 DelayQueue 延迟队列存放具体任务,以达到延迟的效果。

-------------本文结束感谢阅读-------------